Windows
This guide describes how to install a Confire Cloud Agent on Windows 10 (22H2). Please install one Agent for each network you want to manage:
Requirements
- Before installing the Agent, check the minimum system requirements:
| Component | Requirement |
|---|---|
| Processor | Intel® Celeron® N3450 processor or higher |
| Chipset | Integrated |
| Memory | 4 GB (1x DDR3L-1600 MHz) |
| Storage | mSATA 128 GB SSD |
| Operating system | Windows 10/11 22H2 or later |
Installation
Create an Agent in Confire Cloud
- In the left-hand menu, click
Agents/Networks:

- Click the three dots in the upper-right corner, then select
+ Add:

- Enter a name for the Agent and select a tenant:

- Click
OK. You will need the displayed Agent ID later when configuring the Agent.
Install the Agent software
-
Sign in to Windows with an account that has administrator privileges.
-
In Confire Cloud, click
Agents/Networksin the left-hand menu:Click the three dots in the upper-right corner, then select
Download Agent: Windows: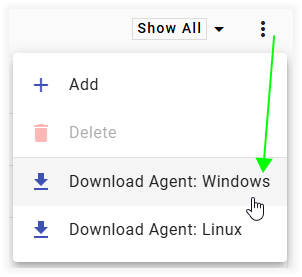
-
Extract confirecloud.agent.zip to
C:\confirecloud.agent\.

Edit the production configuration file
-
Download the latest appsettings.Production.json file to
C:\confirecloud.agent\. -
Open
C:\confirecloud.agent\appsettings.Production.jsonin a text editor. -
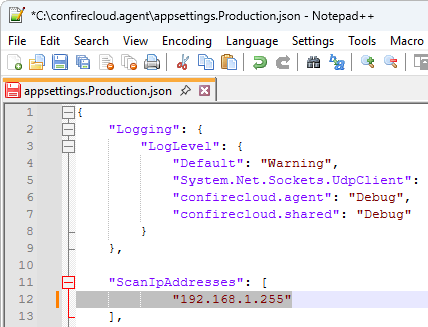
Under
ScanIpAddresses, enter the IP addresses or broadcast addresses the Agent should scan, e.g."192.168.1.255":
- Copy the GUID created in the previous step into the
AgentIdfield:

-
Under
Broker→RabbitMQ→Endpoint, enter the RabbitMQ credentials found in the "Installing the Confire Cloud Agent" section of the email "Confire Cloud - Login Credentials":Host:mq.confire.cloud(the same for all instances; do not change)Port:32672(do not change)VirtualHost: Your RabbitMQ virtual hostUsername: Your RabbitMQ usernamePassword: Your RabbitMQ password
Change only the values for
VirtualHost,Username, andPassword.

- Save the file.
Register the confirecloud.agent service
- Run Windows PowerShell as administrator:

- Enable script execution (confirm with
[Y]):
- Navigate to the production directory:
- Run the PowerShell script register-confirecloud-agent-exe.ps1:
The confire.agent service starts:
Status   Name               DisplayName
------   ----               -----------
Stopped  confirecloud.agent confirecloud.agent
Service registered and started successfully.
Finished. Press Enter to exit.:
- Open
services.mscand verify that the confirecloud.agent service is running. You can now close the Services and PowerShell windows.

Configuration
Specify devices manually
Instead of relying on automatic discovery via network broadcasts, you can specify the IP addresses of the devices the Agent should manage. This is particularly useful in environments where broadcast discovery is restricted or devices must be managed across different subnets.
In the following example, five devices were discovered using broadcast discovery:

Instead of using broadcast discovery, we now want to discover only two specific devices, DIRECT-Raum-001 and DIRECT-Raum-002. To do this, enter the devices manually in appsettings.Production.json:
- Under
ScanIpAddresses, delete the entry"192.168.1.255":

- Enter the IP addresses of the desired devices. Make sure there is no comma after the last entry:

- Save appsettings.Production.json and restart the confirecloud.agent service:

- Only the two specified devices are now discovered:

Upgrade
To benefit from all the latest Confire Cloud features, make sure your Agents are running the latest software version.
-
Sign in to the Agent computer with administrator privileges.
-
In Confire Cloud, click
Agents/Networksin the left-hand menu:Click the three dots in the upper-right corner and select
Download Agent: Windows: -
Extract confirecloud.agent.zip to your Downloads folder.
-
Open
services.mscand start the confirecloud.agent service:
-
Replace
C:\confirecloud.agent\confirecloud.agent.exewith the version from the Downloads folder:
-
Open
services.mscand start the confirecloud.agent service: