Linux / Raspberry Pi
This guide describes how to install a Confire Cloud Agent on a Raspberry Pi or a 64-bit ARM-based Linux system.
Please install one agent per network you want to manage.
Requirements
- Before installation, make sure your system meets the following minimum requirements:
| Component | Requirement |
|---|---|
| Processor | ARM Cortex-A53 or better (ARMv8-A 64-bit) |
| RAM | At least 1 GB (2 GB or more recommended) |
| Storage | At least 10 GB free (20 GB recommended) |
| Display output | Optional – only required when using a desktop environment |
| Network | Ethernet or Wi-Fi (for online features and updates) |
Recommended platforms
The agent runs reliably on:
- Raspberry Pi 4 (Model B or newer) – with a 64-bit operating system
- Raspberry Pi 5 – with a 64-bit operating system
- Virtualized or emulated 64-bit ARM Linux environments (e.g. QEMU, Docker ARM64 containers)
Installation
Create an agent in Confire Cloud
- Click
Agents/Networksin the left-hand menu:

- Click the three dots in the top-right corner and select
+ Add:

- Enter a name for the agent and select a tenant:

- Click
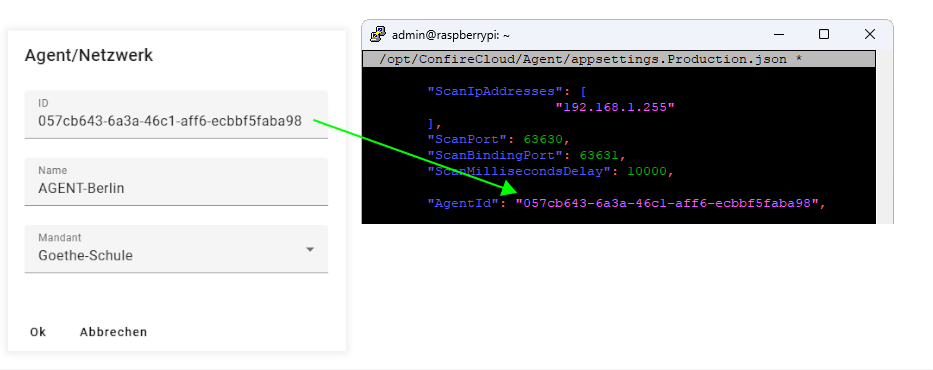
OK. You will need the displayed Agent ID later when configuring the agent.
Install Agent Software
You can download the agent software either from your Confire Cloud instance or via the command line.
Option 1: Download from Confire Cloud
- In Confire Cloud, click
Agents/Networksin the left-hand menu:
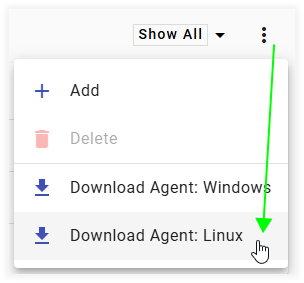
- Click the three dots in the top-right corner and select
Download Agent: Linux:
- Download the Linux agent software and transfer the archive to the Linux system on which you want to install the agent.
Option 2: Download via the command line
Alternatively, download the agent software directly to your Linux system using the following command:
Whichever download method you choose, complete the following steps.
- Create the installation directory:
- Extract the downloaded archive:
Edit Production Configuration File
- Download the
appsettings.Production.jsonconfiguration file:
sudo curl -o /opt/ConfireCloud/Agent/appsettings.Production.json https://download.stueber.de/doc/de/confirecloud/agent/appsettings.Production.json
- Open
appsettings.Production.jsonin a text editor:
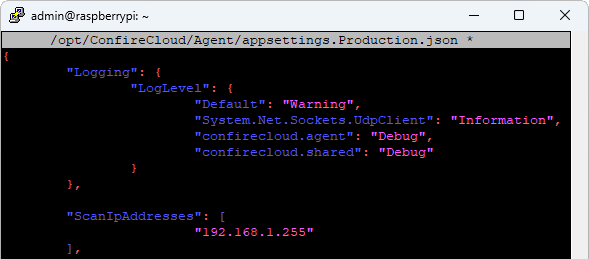
- Under
ScanIpAddresses, enter the IP addresses or broadcast addresses the agent should scan, e.g."192.168.1.255":
- Copy the GUID created in the previous step into the
AgentIdfield:
-
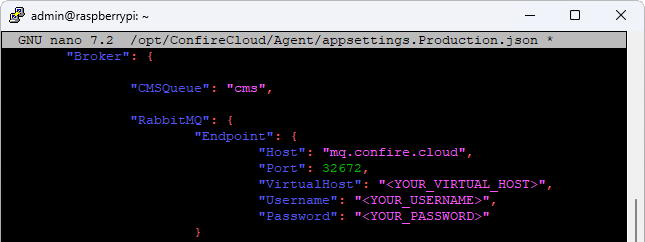
Under
Broker→RabbitMQ→Endpoint, enter the RabbitMQ credentials found in the "Installing the Confire Cloud Agent" section of the email "Confire Cloud - Login Credentials":Host:mq.confire.cloud(the same for all instances; do not change)Port:32672(do not change)VirtualHost: Your RabbitMQ virtual hostUsername: Your RabbitMQ usernamePassword: Your RabbitMQ password
Only change the values for
VirtualHost,Username, andPassword.
- Save and close the file.
Register ConfireCloudAgent Service
- Copy the service file:
- Enable the service (to start automatically when the system boots):
- Start the service:
- Check its status:
Configuration
Specify devices manually
Instead of using automatic broadcast discovery, you can specify the devices to manage directly by their IP addresses.
This is particularly useful when:
-
Broadcast discovery is restricted on the network
-
Devices are located in different subnets
In the following example, five devices were discovered using broadcast discovery:

Instead of using broadcast discovery, we now want to discover only two specific devices, DIRECT-Room-001 and DIRECT-Room-002. To do this, enter the devices manually in appsettings.Production.json:
- Under
ScanIpAddresses, delete the entry"192.168.1.255":

- Enter the IP addresses of the desired devices. Make sure there is no comma after the last entry:

- Save appsettings.Production.json and restart the ConfireCloudAgent service:
- Only the two specified devices will now be discovered:

Upgrade
To take advantage of all new features, always use the latest version of the agent.
- Stop the service:
- Delete the old files, except for the production configuration file (optional but recommended):
sudo find /opt/ConfireCloud/Agent/ -mindepth 1 ! -name 'appsettings.Production.json' -exec rm -rf {} +
- Download the latest version:
- Extract the archive:
- Start the service:
- Check its status: